Showing posts with label arts and crafts. Show all posts

Thursday, March 17, 2011

St. Patrick's Day

My sincerest apologies that this post is going to be super lamely put together but at least it's here right??? right???

We had a leprechaun leave a note for us this morning...here it is...sideways...and in picture form instead of document form...because those leprechauns are tricky like that. That first little picture in the letter is a picture of May, that yellow blur is a pile of gold coins. The top picture is a green egg (Yes, I may have paid the leprechaun off to make eating breakfast one of the requirements before finding his gold coins). The picture at the end of decorate it with is green glitter. The top picture is a pot of gold followed by May's picture again. The leprechaun left the note with a St. Patrick's day crown for May, green hair for me, and a nice big green hat for May's dad. All of which I'm pretty sure the leprechaun got from the dollar bins at target.

So after eating breakfast, May went upstairs to pick out a green shirt. Oh funny. She pulled out her pink Minnie Mouse shirt and was trying to convince her teddy bear it was green (I don't think he believed her). So we went through her shirts and I asked her if a few were green and she would say , "No that's (insert color here)." In her sweet little "duh mom" voice. So then she put a green shirt on once we got to it.

For the puzzle I just google imaged a 4 leaf clover and printed it. Before I cut it up I traced the shape on another piece of paper so she could see how it was fit together. She put it together the first time but wasn't about to do it again when I asked her to glue it on so I guess I should've had her put glue on the pieces before she put them on. Then she decorated it with glitter.
Cookies were oh so fun and oh so messy. (Side note: Yes I know she has on a green and pink shirt with a purple headband and a red and blue flower, May picked the hair pieces herself and the girl knows what she wants).

I knew I wasn't going to have the energy to make cookie dough so I just bought some premade stuff from the store...never again...although May didn't seem to mind. I cooked a batch ahead of time so they were ready to be frosted at the same time. I skipped the cookie cutters this time and we just made flat shapes and put them on. I think this was actually better. May said she was making, a train, a pirate, and a kite which we have none of those cookie cutters so it would've been a shame to miss out on that.

I bought a can of premade frosting and we divided it up into 6 zip lock bags. I put the food coloring in zipped it up (make sure most of the air is out) and then May mashed it up to get the frosting to turn colors. I clipped the corners off so she could squeeze it out. I thought this might be easier but we resorted to getting out a plastic knife and spreading the frosting anyway. Then we decorated...or mostly ate with a little decorating kind of thrown in there.

After we cleaned up our cookie mess the check list was complete and gold coins started appearing all around the house! That leprechaun (aka grandma being super and picking some up for me at Harman's because I couldn't find any at wal-mart) bought some chocolate coins in gold foil. They come in a net bag and they might be just an Easter time thing but I'm not positive.

Here is May counting her spoils. Happy St. Patrick's Day!

Valentines Day

I know I know, Valentines day was a month ago. Moving and pregnancy have taken their toll and this blog is the first thing that's gotta give. But here are some fun things we did for valentines day. Most of it could be used any ol' time just don't make it valentines stuff.


Starting from the 1st until valentines day we had little mail boxes. I had May color some little cards to put in her dads. I put princess valentines, suckers, and a few dollar store toys in hers. She loved it-she was so excited to open her mail box every morning and she felt so special putting stuff in her dads. It was fun. We made some heart flowers. I let May choose a paper from my scrap book pile. Then I cut out about 10 hearts from it and punched a hole in the middle of them. She put them on the straw. Bendy straws work the best because it stops the hearts from sliding all the way down. Then she did the vase. I measured the paper before and then she taped it onto a juice can. This picture does not do the random tape strips everywhere justice. I think she had more fun taping than doing anything else. Then she decorated it with stickers.

I found this cute valentine heart sorting mat here at prekinders.com. May sorted out the hearts in colors. We got some of them counted...but most ended up in her tummy before the counting began so there ya go. I've seen a mat like this that was just different color O shapes to be used for fruit loops but I haven't really looked for it.

Thursday, November 4, 2010

E is for...

E is for egg...

We did an egg hunt for these puzzle eggs. We found the pieces throughout the house and then put them together at her table.
We did this egg shell craft. I've been dreading doing this but it actually was really great. This was the first time May has actually understood that glue makes things stick if you leave them there long enough. I just rinsed out some egg shells and then dyed them with food coloring. May mixed them up in the bag and glued them on the E paper.
E is for elephant...
We did some stuff from Confessions of a Home schooler although not very vigilantly. We also did just some regular coloring pages that we had in our coloring book that had elephants on it.

Our flip book animal was an elephant. May had a really hard time making the "eh" sound and she didn't really recognize it when we came back to it later so we'll have to revisit this one soon.

E is for envelope...

I have some bright colored envelopes that I put the numbers 1-10 in and put them around the house. I taped different numbers and envelopes up on the wall. When may found the envelope then she would take the number inside and match it to the number on the wall and then match the envelope to the other one on the wall.

Monday, September 27, 2010

Finger printing

We used ink pads to make some finger print art this week. I think next time we do it I'm just going to put a big piece of paper on the table instead of giving her little ones.


C is for...

C is for clothespins.
We practiced putting clothespins on things a lot this week. M* didn't quite get it but she had a lot of fun pretending to clip things on and of course she knew exactly how to get them off. I cut some clothes shapes out of felt and we made a mini clothes line for her to clip them on. She had fun just trying to put them on but I would also ask her to find me the one that was pink or blue etc... and then ask for a specific clothes item like a sock.

For this activity you need clothespins circle stickers (like the garage sale stickers) and bowl or a cup. I used a cool whip bowl and put paper around the outside. Stick different color stickers around the outside and have a coordinating clothes pin for it. I put sticker on the inside and outside of the bowl. M* wouldn't turn the bowl or let me turn the bowl so this way she could do all around it without upsetting her.

C is for cake. We made a cake this week. M* loves to bake. She is a pro and dumping all the ingredients in and stiring them up.

C is for camping.
We set up a tent in my mom's backyard for the day. (I am greatly looking forward to the day when we have our own backyard to set things up in). The first thing we did in our tent was put together a simple puzzle. I used this picture here and cut it up into about 5 pieces. Then we did our caterpillar activities that we had been doing through out the week (see below). And then we went on a "C" hunt. I clipped some papers with the letter C written on them around the tent (using clothespins) and had M* find them and put them in her bag. To finish the camping fun we made some smores in the microwave.


C is for caterpillar.
I found this new great website. This gal is amazing I can't believe how talented she is. We will definitely be using her things as part of our letters. The blog is called Confessions of a Homeschooler. Here is the link to her letter C stuff. Some of it was a little too old for M* but we used the color matching caterpillars, the letter lace card, and the lacing cards for the story "The Very Hungry Caterpillar". All of which M* was able to do with to problem (she is almost 2 just to give you an idea).

Also, just out of pure happenstance we made this cute chicken at the library story time.
You need a cup, a piece of string, a small piece of felt, a small piece of sponge, and something to poke a small hole (we used a skewer). They also gave us eyes and an orange nose (that was torn off before I took this picture) but you could just draw those on.

Poke a small hole in the top of the cup. Thread the string through and tie a knot onto a red piece of felt.
Tie the small piece of sponge onto the bottom of the string. Then let your child color it and decorate it however you want.

When it's done you make it make a noise by wetting your fingers a bit and pulling down on the string. It actually makes a chicken noise it's pretty cool.

Wednesday, September 8, 2010

G is for... and B is for..

G is for garden.
We went to the Thanksgiving Point Gardens. We looked at the flowers for a little bit but spent most of our time in the children's garden. M* had lots o' fun hiding in the trees and running in and out of the bear cave.
G is for grow.
I found these at the dollar store you put them in water and then they grow. M* wasn't terribly impressed with the growing part but had lots of fun putting the beans in the water and then taking them back out.
G is for green.
We did a "green" scavenger hunt where we looked for things in the house that were green. M* decided about 10 mins into it that she was done finding green things and wanted to find pink things instead. What a girl.
G is for goat.
We also got a book from the library on goats and made a trip to the farm to look at them but of course we mostly looked at the bunnies instead.

Other things I wanted to do but we didn't get around to was make a giraffe puppet here are the instructions here, plant some flowers (garden), and make gingerbread men.


B is for balloon.
We did a couple things with balloons. The first thing was I hung balloons from the ceiling and let M* hit them with a bat. In the picture below though she had decided that the golf club was a better tool for the job. She was quite distracted by the static electricty. You will notice her small amount of hair is sticking up.
We also painted some balloons. It was a nice change to just painting on paper. I taped ours down onto bigger paper it was easier for her to paint and easy clean up for me. I also saw an idea on perpetual preschool that said to tape a few balloons (not full of air) to a dowel and let the child use it as a brush but we didn't try it so I don't know how well it works.

B is for bird.
We did some bird watching outside our complex. We live right by a canal so there is nice variety. We also took some bird seed out there and threw it out for them.
B is for bubble.
The library had a bubble party (this was my sole reason for doing b on the week we did). M* had lots of fun. We were going to try an activity at home where you tape a clear lid (like on a pringles can) to a flash light and catch the bubbles on it. It's supposed to make it easy to see all the colors in the bubble. I bought cans just for the occasion and threw them out without thinking about it.
Other things I had planned but we didn't have time to do were float some boats in the bath tub (you could make your own or just use a toy boat), and go bug hunting.

Tuesday, July 20, 2010

F is for...

We are starting doing things using the Amazing Action Alphabet book. You can check our their products at http://www.seeheardocompany.com/ The idea is to do their flip book and then do activities with the letter. You introduce a letter every 2 weeks or so. Along with all these activities we always looked at the flip chart before we started them to review the letter and the sound.

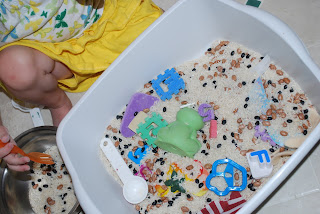
The first thing we did with the letter F is a rice pit. You make a rice pit by buying a small container with a lid I bought a 16 quart and pour a bunch of rice in it. I used 3 bigger bags. I also used beans but I would recommend just using rice. We started with things that are the letter F or start with F, like magnets, cookie cutters, frog, farmer, feather, flag. As your child digs things out say the name with emphasis on whatever letter you are doing it with. After we do the letters M* likes to play in it with spoons, bowls, and measuring cups.

F is for feather.
In the morning we did a craft with feathers. I drew a bird on a paper and then M* glued feathers on it and painted it with water colors. That afternoon we visited the aviary and I pointed out all of the feathers on the bird.

F is for fort and flash light.
We built a blanket fort and played under it all morning. We played with flashlights under it and read books.

F is for fish.
In the morning we did a fish pond. Tie string onto a small dowel or pencil and then glue a magnet onto the other end of the string. Cut out fish shapes and place paper clips on them. On the back of the Fish you can write things like, "jump up and down 10 times" or "sing wheels on the bus". You can spread the fish around the room or I put them in a small basket to keep it a little contained and easier to catch a fish. That afternoon we went to the aquarium. If you don't live by and aquarium you can head to the pet store to look at fish.

F is for face.
I drew different eyes, ears, noses, and mouths and taped them on the wall then had M* move them around to create different faces. Another way to do this would be to put them on flannel or Velcro and use it on the flannel board.

Thursday, May 6, 2010

Playdough and Shapes

M* got Playdough in her Easter eggs. She loves to have play with it but doesn't quite grasp the concept as to what you are supposed to do with it. So to make things more interesting for me and perhaps a little educational for her I quickly drew out this...

Then she can match the shape the playdough is in to the shape on the paper. I think she mostly likes picking the playdough up and then pounding it back down on the paper but hey, one day those triangles will match up.

Feet-er Paint

We have been so excited for spring at our house. Unfortunately we thought it was here, unfortunately winter hasn't gone down without a fight, so we've been inside more than we would like. But we've done a couple fun things, this one is definitely the messiest-and the funnest (is funnest a word?).

Materials:
Butcher paper (I've been saving the paper they wrap your things in from Thai Pan for a while just for such an occasion)
Tape
Washable Finger Paint (I know it says washable but are you SURE it's washable?)

Tape the paper down to cover a spot or your whole kitchen floor. I would somehow barricade the carpet areas-our kitchen has a very small entrance so I just put a chair there so M* couldn't escape easily. I put the finger paint on plates but I think it would work even better if you just put it straight onto the paper. Let your kid go to town walking with the paint all over the paper. Towards the end she sat in some and then scooted down the paper, that was a riot, then we just painted with our fingers. Be sure when you are walking to keep fresh paint on your little ones feet because once it becomes a little dry little feet start to stick to the paper.

Alternative: Put on some music and dance whilst feet-er painting.

Just a tip have something to at least wash your feet off so that you can carry you and your child straight to the tub.

Saturday, March 20, 2010

Farm Themed Day


What kid doesn't love farm animals?? Oh...you there in the pink, your kid doesn't? Well...weird...


Have a farm day! Eat only things from a farm (if you stretch enough you could really make anything come from a farm). Talk about what animal lays eggs, what animals make milk, how crops grow etc. Your child may not understand exactly what you're saying but exposure is key.

Go visit a farm. If you don't have a farm in your area chances are you do have a petting zoo. Check out this website for help finding one. http://www.pettingzoofarm.com/ They have a lot of states missing so try google if you can't find one.

Follow the visit up by some quiet story time about farms. Hit the local library if you don't have any.

If your child is old enough make a craft that has to do with a farm animal. Keep it simple like turkey handprints or make a yellow pom pom into a chick.


Tuesday, March 9, 2010

Mail Box

Materials:
Shoe box
Paper and/or Stickers (optional)
Envelopes
Paper

Cover shoe box in paper. I taped and glued mine in hopes that it would last a little longer but I don't think it's going to make a difference. Cut a slot in the top of the box. I put letters on the top that says mail, they were promptly torn off. Make "letters" to go in the mail box. I had M* put some stickers on some 3x5 cards for our letters. I think it would be fun to put a new letter in every so often. Maybe some days put some "packages" in, like some dollar store toys or a treat.

Saturday, March 6, 2010

Edible Playdough

I'm a big fan of edible playthings, mostly because I'm a big fan of eating. Here is a recipe for edible play dough.

Materials:
1 cup peanut butter
1 cup corn syrup
1 1/2 c powdered sugar
1 1/2 c powdered milk

Mix it all together and mold!

Wednesday, March 3, 2010

Cardboard Kitchen

M* Loves playing with pretend kitchens. That is all she does at her cousins house. Unfortunately I just can't justify spending $100 on a toy "just because." I was so excited when I found this idea in Family Fun. Their rendition is much prettier but this works for us. I'm not terribly great at writing tutorials but I think the pictures are pretty self explanatory.

Materials:
Cardboard box (you need a pretty good size box but you can make it as large or as small as you want)
Extra Cardboard
Two pieces of paper (different colors)
Bowl
Paint (optional)
Milk Carton Lids or Similar


First decide where you are going to put your "sink" trace outline of bowl onto top of box. Using a razor blade cut 1/4-1/2" inside the circle-so your bowl should have something to hang onto. From separate cardboard cut out the shape of your sink-like a candy cane. Cut a big enough slit into the main box so that you can slide the sink down into it.

Trace 2-4 circles on one piece of paper, cut out, glue onto the other piece of paper to make the "stove". Secure milk caps for knobs on the stove (I think it would be cool if you had long brads to secure them with so they could turn but we just used glue).


On the front of box cut out shape of oven. You can cut out a window out of the center if you would like. If your box is smaller you will want to cut it to the side so you will have enough room for your cupboards in a future step. Cut a strip from your extra cardboard and secure on as the oven handle.
When you cut out your cupboard be sure to leave enough of a boarder (the part in blue) so that your box is still supported. Cut two parallel horizontal lines and then a vertical one to divide them.

If you have enough extra cardboard you can cut out a panel to insert between the cupboard space and the oven space. We also added a shelf to our oven by gluing it in between the two walls.
On the opposite side of the cupboards make two holes line up with each other. Secure a ribbon using the two holes to use as a towel holder.
Paint. Then insert bowl into the hole you cut out for the sink.

Hopefully you haven't lost your mind reading my (terrible) instructions. M* has really had a lot of fun with it and it only took me about 45 mins to make. Good luck!

Wednesday, February 10, 2010

Winter Garden

Materials:
Paper
Straws
Paper cup (I used one of those big yogurt containers)
Tape
Stickers

Cover pot with paper using tape. Cut out flower shapes. Depending on the age of your toddler you can do this before hand or let them help. Use stickers to decorate pot and flowers have your child help you tape straws on the back. Then put them in the pot.


This didn't take us long to put together but M* has spent tons of time taking the flours out of the pot and putting them back in. I think maybe next time we sit down to do something crafty we'll make some "bugs" to tape to straws and add them in. Also, we pulled out pipe cleaner to wrap around he straws but M* wasn't interested but maybe your child will be.

Valentine Cards

Materials:
Paper (folded for cards)
Stickers
Stamps (I would say already inked stamps are the way to go. First because then you don't have to have a constant battle with your toddler over who gets to hold the ink pad and second they don't ink all over little hands as easily)
Crayons
Markers (only if you are brave!)

Pretty self explanatory. Usually if we color we only use crayons or stickers but for this we pulled out everything. My daughter was actually interested in it for a good hour, which I contribute to the variety of things she had to use. We made our cards for Dad and Grandparents.


Saturday, January 16, 2010

Edible Finger Paint

Materials:
Instant Vanilla Pudding
Milk
Food Coloring
Paper

Mix the pudding according to the directions. Divide into smaller bowls. Add a couple drops of food coloring to each bowl to color them. Paint!

She had so much fun with this. I think she got more on her than she did on the paper. It wasn't hard to clean up though. I found that if I painted on the paper she painted on the paper but if I wasn't painting she wasn't painting. So get in there and get messy!